One day, document checking processes had become a bottleneck at work, so I decided to build something on AWS – partly to organize my own thoughts.
What I’m building here is a checking system for internal blog posts. While it’s scoped to internal blog articles specifically, the design can be generalized for all kinds of checking workflows, so think of this as a prototype.
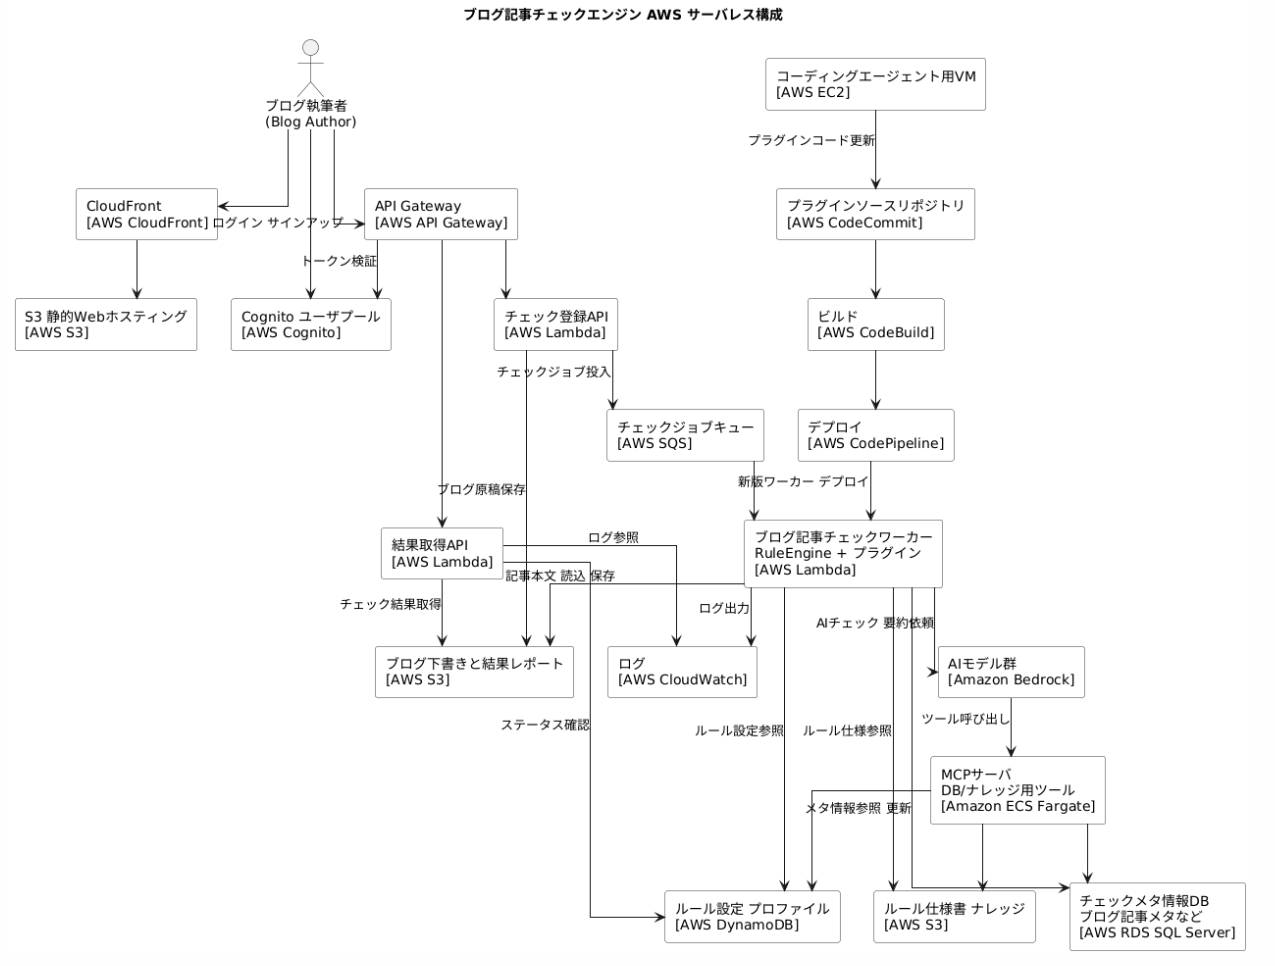
Here’s what the architecture looks like.
Architecture Diagram
Business Requirements
- In practice, this will be used by people in the business division.
- There are various checking rules for blog articles, combining programmatic checks with AI-based checks.
- Users can create and modify checking logic through conversations with AI.
- Checking logic is integrated into the system as plugins.
- A database is set up, and the checking logic accesses it through a DB service layer. (Databases get expensive, so I might stub this out for now.)
That was a long preamble, but I want to document the journey of building the system above as a reference for myself.
A Note on AWS Service Selection
I haven’t gone through any formal, structured learning as an AWS Builder. I picked my services by consulting GPT-5.1, so there might be some choices that don’t follow AWS best practices. My plan is to build it first and then ask the AWS veterans for their input.
…Maybe I’ll ask at AWS AI Builders Day!
(1) Frontend / User Authentication
CloudFront + S3 + Cognito
Note: CloudFront is the entry point for external access, S3 is object storage, and Cognito is a managed service for user management.
Let’s start with the CloudFront setup.
I asked GPT-5.1 to create a Canvas and walked through the CloudFront build steps.
Originally, I was planning to implement user management from scratch, but I learned that Cognito handles that nicely. …AWS really does have a generous lineup of managed services.
While I’m at it, let me learn about GitHub CI pipelines too – so I can deploy from Git via CI.
By the way, when I ran git init, Git suggested changing the default branch name from master to main. Apparently, Git’s default used to be “master,” but in recent years there’s been growing awareness that the “master/slave” terminology evokes racial discrimination and slavery, which led to the movement to adopt the more neutral “main.”
Getting back on track – I managed to create a simple SPA and set up the repository. There weren’t any major stumbling blocks up to this point. I only had a bit of trouble with Cognito-based user authentication, but overall things went smoothly. Next time, I’ll start working on automated deployment.
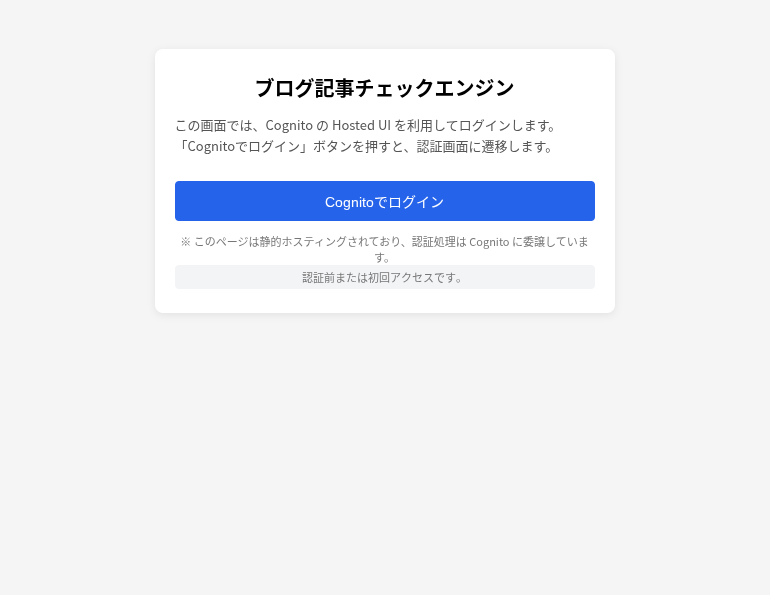
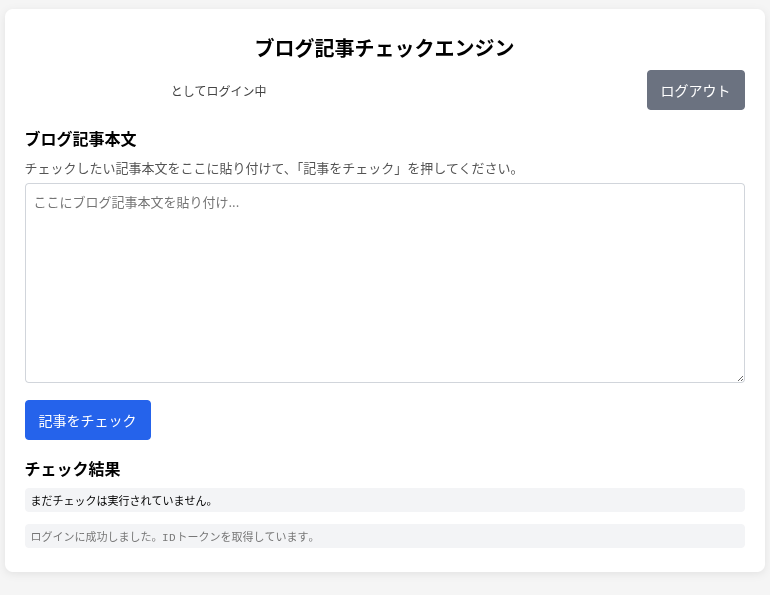
Below is the build log (procedure notes) created with GPT-5.1.
Blog Article Check Engine – Build Log
This document serves as the work log for building the Blog Article Check Engine on AWS.
0. Prerequisites
- Region: us-west-2 Oregon
- System name: Blog Article Check Engine PoC
1. CloudFront Setup
1-0. Pre-checks
1-1. Creating a New CloudFront Distribution – Step 1: Get Started
- Open the CloudFront console, go to Distributions in the left menu, and click Create distribution
- On the “Get started” screen, configure the following:
- Distribution name: something descriptive like
blog-checker-web-dist - This is essentially a tag-like name and doesn’t affect the URL
- Description: leave empty (add later if needed)
- Distribution type: select Single website or app
- Domain: leave empty for now (set later if using a custom domain via Route 53)
- Tags: optional. Add something like
Project = blog-checker-webif desired
- Distribution name: something descriptive like
- Click Next in the bottom right to proceed to Step 2: Specify Origin
1-2. Creating a New CloudFront Distribution – Step 2 Onward
- Step 2: Specify Origin
- Origin type: select Web
- Origin domain: select your S3 bucket
blog-checker-web-XXXX(e.g.,blog-checker-web-example) from the dropdown - Example:
example-bucket.s3.us-west-2.amazonaws.com - If you see a message like “This S3 bucket is configured for S3 Web hosting. If you plan to use this distribution as a website, we recommend using the S3 website endpoint instead of the bucket endpoint” – no changes needed
- Leave everything else at defaults and click Next
- Step 3: Enable Security
- This step lets you choose whether to attach AWS WAF (Web Application Firewall) to CloudFront
- For the Blog Article Check Engine PoC, select Do not enable security protections to keep costs and configuration simple
- Don’t use “Use existing WAF configuration” or “Create new WAF”
- Leave “Use monitor mode” off
- WAF can be added later when needed
- Click Next in the bottom right to proceed to Step 4: Configure Distribution
- Step 4: Configure Distribution
- Under Default cache behavior, set the following:
- Viewer protocol policy: select Redirect HTTP to HTTPS
- Allowed HTTP methods: select
GET, HEAD(sufficient for now) - Cache policy: select
Managed-CachingOptimized - Compress objects automatically: leave enabled
- Leave everything else at defaults and click Next
- Step 5: Get TLS Certificate
- For now, select “Use the default CloudFront certificate”
- If using a custom domain, set up an ACM certificate later
- Click Next to go to the final review screen
- Step 6: Review and Create
- Review your settings and click Create distribution if everything looks good
1-3. Distribution Settings and Default Cache Behavior
- In the Default cache behavior section:
- Viewer protocol policy: select Redirect HTTP to HTTPS
- Allowed HTTP methods: select
GET, HEAD(sufficient for now) - Cache policy: select
Managed-CachingOptimized - Compress objects automatically: leave enabled
- Leave other settings at defaults; fine-tuning can be done later
1-4. Domain and Certificate Configuration
- For now, use the auto-generated CloudFront domain name
xxxx.cloudfront.netas-is - If using a custom domain later, plan to configure:
- Alternate domain name (CNAME)
- ACM certificate
1-5. Creating the Distribution and Verifying It Works
- Click Create distribution at the bottom of the screen to start creation
- In the Distributions list, wait for the target distribution’s Status to change from
DeployingtoEnabled - Once Status is Enabled, note the Domain name for that row
- In your browser, go to
https://{CloudFront Domain name}/index.htmland confirm that the login screen from theindex.htmluploaded to S3 is displayed - If accessing
https://{CloudFront Domain name}/returnsAccessDenied, set up CloudFront’s default root object as follows:- Open the target distribution in the CloudFront console and click Edit on the General tab
- Enter
index.htmlin the Default root object field - Save the changes and wait a few minutes for the status to become Deployed
- Access
https://{CloudFront Domain name}/again and confirm thatindex.htmlis displayed
1-6. Updating the S3 Bucket Policy for OAC
- Open the target distribution in the CloudFront console and select the Origins tab
- Select the row for the S3 bucket configured as the origin and click Edit
- Copy the sample policy shown in the “Update bucket policy” section
- In a separate tab, open the S3 console, navigate to the target bucket -> Permissions -> Bucket policy
- Replace the existing policy with the sample policy from CloudFront and save
- Keep Block public access enabled – the setup ensures access only through CloudFront OAC
- If needed, disable public access to the S3 website endpoint (for production use)
2. Creating the S3 Static Hosting Bucket
2-1. Creating a Bucket for Web Hosting
- Confirm the region in the top-right of the AWS console is
US West (Oregon) us-west-2 - Open S3 from the service list
- Click “Create bucket”
- General configuration
- AWS Region: leave as
US West (Oregon) us-west-2 - Bucket name: enter a unique name like
blog-checker-web-example(lowercase and hyphens only) - Copy settings from existing bucket: leave unselected
- AWS Region: leave as
- Object Ownership
- Keep “ACLs disabled (recommended)” selected
- Object ownership stays as “Bucket owner” – that’s fine
- Block Public Access settings for this bucket
- Keep all four checkboxes checked
- It should show a note saying “Block all public access” – that’s correct
- Access will be granted later through CloudFront OAC and bucket policy
- Scroll down; leave versioning, encryption, etc. at defaults (no changes needed for now)
- Click “Create bucket” at the bottom right
- Confirm the bucket name appears in the bucket list, and note the actual bucket name in the build log
2-2. Enabling Static Website Hosting
- Open S3 in the AWS console
- Click the bucket name link for the target bucket (e.g.,
blog-checker-web-example) in the bucket list - Click the Properties tab at the top of the bucket detail screen
- Scroll down the Properties page and find the Static website hosting section
- Click the Edit button on the right side of the Static website hosting section
- Under Hosting type, select Host a static website
- Enter
index.htmlfor the Index document - Error document can be left empty, or enter
error.htmlif you plan to create one later - Click Save changes at the bottom right
- The Static website hosting section will now show a
Bucket website endpoint– note this URL in the build log
2-3. Uploading Initial Content
Here we’ll upload the index.html from the local blog-checker-web/dist/ directory to the S3 bucket.
- Confirm that
blog-checker-web/dist/index.htmlexists locally - Open S3 in the AWS console and click the bucket name link for the target bucket (e.g.,
blog-checker-web-example) - Confirm the
Objectstab is selected at the top - Click the “Upload” button in the top right
- On the upload screen, click “Add files” and select your local
dist/index.html - Scroll to the bottom; leave the storage class at the default “Standard”
- Leave access permissions at defaults (public access will be handled later through CloudFront OAC)
- Click the “Upload” button at the bottom right
- Once you see the upload complete message, go back to the
Objectstab and confirm thatindex.htmlappears
3. Creating a Cognito User Pool
Here we’ll create the Cognito User Pool used for login authentication in the Blog Article Check Engine. This covers the preparation needed to connect from the frontend (CloudFront + S3) login screen.
3-1. Creating a New User Pool
- Confirm the region in the top-right of the AWS console is
US West (Oregon) us-west-2 - Open Cognito from the service list
- Select User pools from the left menu
- Click Create user pool in the top right
- On the “Configure sign-in experience” screen:
- Select Cognito user pool (not using external IdP for now)
- Sign-in options: check Email only (login with email address rather than username)
- Click Next
- “Configure security requirements” screen
- Password policy: leave at defaults (minimum 8 characters, etc.)
- Multi-factor authentication (MFA): select No MFA (this is a PoC)
- Leave other settings at defaults and click Next
- “Configure sign-up experience” screen
- Self-service sign-up: turn ON if needed (if you want to sign up yourself)
- Required attributes: set only email as Required
- Attribute verification: check Email (email verification)
- Click Next
- “Configure message delivery” screen
- Use the default Cognito email provider (don’t configure SES)
- Click Next
- “Integrate your app” screen
- User pool name: something descriptive like
blog-checker-user-pool - App client settings will be configured in 3-2, so just click Next
- User pool name: something descriptive like
- On the Review screen, verify the settings and click Create user pool if everything looks good
- Note the created User Pool ID (e.g.,
<your_user_pool_id>)
3-2. Creating an App Client (for the Web Frontend)
- Open the user pool you created, then go to App integration -> App clients in the left menu
- Click Create app client
- Enter
blog-checker-web-clientor similar for the App client name - Authorized client type:
- Select Public client (no secret needed since it’s called directly from frontend JavaScript)
- Authentication flows:
- Enable user password authentication flows like USER_PASSWORD or USER_SRP (defaults are fine)
- OAuth 2.0 settings can be skipped for now (configure later alongside the Hosted UI if needed)
- Leave other settings at defaults and click Create app client
- Note the created App client ID (e.g.,
<your_app_client_id>)
3-3. Domain Setup (Preparation for Hosted UI)
- Open App integration -> Domain name in the User Pool screen
- Enter a unique string like
blog-checker-authas the Cognito domain prefix - Confirm that the domain like
auth.us-west-2.amazoncognito.comis available and save - Note the generated domain URL (e.g.,
https://<your-domain-prefix>.auth.us-west-2.amazoncognito.com)
3-4. Notes on Connecting with CloudFront / Frontend
Information needed to connect from the frontend (https://<your-cloudfront-domain>/) to Cognito:
- Region:
us-west-2 - User Pool ID:
<your_user_pool_id> - App client ID:
<your_app_client_id> - Cognito domain:
https://<your-domain-prefix>.auth.us-west-2.amazoncognito.com
These values will later be embedded as configuration in assets/js/app.js, used in the implementation that calls Cognito’s sign-in API from the login form.
If using the Hosted UI, the Callback URL and Sign out URL need to be registered with the CloudFront URL in the Cognito app client settings (a follow-up task).
4. Git / GitHub Initial Setup Notes
4-1. Creating a Local Repository
- Navigate to the
blog-checker-web/directory locally - Run the following to initialize a Git repository:
cd blog-checker-web
git init
- Create a
.gitignoreto excludedist/and temporary files (can be updated later):
# .gitignore example
node_modules/
dist/
.DS_Store
.env
- Initial commit:
git add .
git commit -m "Initial commit: blog checker web skeleton"
4-2. Linking to a GitHub Repository
- Create a new repository on GitHub
- Repository name:
blog-checker-web-demo - Auto-generating README or .gitignore is fine either way (we’ll push from local this time)
- Repository name:
- Following the
git remote/pushcommands shown by GitHub, run the following locally:
git remote add origin git@github.com:<your-account>/blog-checker-web-demo.git
git branch -M main
git push -u origin main
- Running the above commands pushes the initial code to the
<your-account>/blog-checker-web-demorepository on GitHub
4-3. Relationship to Deployment
- If setting up automated deployment via GitHub Actions in the future, the plan is to use this
blog-checker-web-demorepository as the trigger. - For now, uploading from local to S3 (manually or via shell script) is the approach, with GitHub serving as code history management and backup.
Upcoming Task Ideas
- Create a local deploy script (
deploy.sh) to automatedist/ -> S3uploads and CloudFront cache invalidation - Add a GitHub Actions workflow (
.github/workflows/deploy.yml) triggered by pushes to themainbranch for automated deployment - Organize the blog article checking logic in a plugin-style architecture, designing it to align with future check plugin structures for other document types
- Consider implementing Authorization header attachment using authenticated user info (id_token) for future API Gateway / Lambda integration
Note: Specific values such as CloudFront domain names, Cognito User Pool IDs / Client IDs, and GitHub account names have been replaced with placeholders (<your-...>, xxxx.cloudfront.net, etc.) for blog publication.